The CAGED System

foundationsfretboardchordsscales

What it is, and what it isn’t

The CAGED system is in fact not a “system” at all, but merely a phenomenon that automatically occurs on the six-string guitar when it is tuned in the standard tuning. Understood that way, it is beneficial when studied thoroughly and applied sensibly.

It is a foundational practice: learning its possibilities as well as its limitations is part of gaining a full understanding of the instrument in standard tuning. The ultimate goal is to hold a complete mental image of any particular selection of notes on the fretboard. For a number of very common patterns, such as the most common scales, the CAGED system applies well.

It is not the only way to navigate the fretboard. Other methods are useful too, and in some cases the CAGED system will not even apply.

The CAGED system in common scales

The five shapes connect the whole neck for many of the most common scales. Browse the full-neck map and the five shapes below: the interactive, fully mapped versions live in Fretly.

Scale 1 of 7The CAGED System
Switch scales with the pills, the arrows, or when the console is focused.

No 1 C Major, Full Neck

Notes: C D E F G A B 1 – 2 – 3 – 4 – 5 – 6 – 7

C Major, Full Neck, C major scale, Fretly rendering

Every note of C major across the whole neck. The five shapes below are windows onto this one map; browse them in order and watch each one hand over to the next.

Explore the CAGED system in Fretly

Backing tracks

Jam this scale over these. They open on the track page.
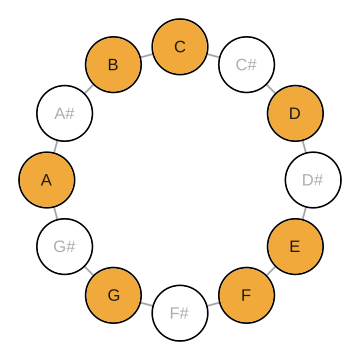
C major scale circle diagram, Fretly rendering

Triads

CC, E, G Csus2C, D, G Csus4C, F, G DmD, F, A Dsus2D, E, A Dsus4D, G, A EmE, G, B Esus4E, A, B FF, A, C Fsus2F, G, C GG, B, D Gsus2G, A, D Gsus4G, C, D AmA, C, E Asus2A, B, E Asus4A, D, E BdimB, D, F

Seventh chords

Cmaj7C, E, G, B C6C, E, G, A Cmaj7sus4C, F, G, B Dm7D, F, A, C Dm6D, F, A, B D7sus4D, G, A, C Em7E, G, B, D E7sus4E, A, B, D Fmaj7F, A, C, E Fmaj7b5F, A, B, E F6F, A, C, D G7G, B, D, F G6G, B, D, E G7sus4G, C, D, F Am7A, C, E, G A7sus4A, D, E, G Bm7b5B, D, F, A

This scale holds many more chords than these, with extensions, inversions and every voicing on the neck. Find them all in Fretly

No 2 The C Shape

Frets: 0-3 1 – 2 – 3 – 4 – 5 – 6 – 7

The C Shape, C major scale, Fretly rendering

The open-position C major fingering. Anchored on the A string, frets 0 to 3. Active notes are the shape; the grey notes are the rest of the scale waiting in the neighbouring shapes.

The chord form this position is built around
The C major chord grip for this CAGED position
Explore the CAGED system in Fretly

Backing tracks

Jam this scale over these. They open on the track page.

C major scale circle diagram, Fretly rendering
How to play this position
How the CAGED 'C' chord shape connects

Triads

CC, E, G Csus2C, D, G Csus4C, F, G DmD, F, A Dsus2D, E, A Dsus4D, G, A EmE, G, B Esus4E, A, B FF, A, C Fsus2F, G, C GG, B, D Gsus2G, A, D Gsus4G, C, D AmA, C, E Asus2A, B, E Asus4A, D, E BdimB, D, F

Seventh chords

Cmaj7C, E, G, B C6C, E, G, A Cmaj7sus4C, F, G, B Dm7D, F, A, C Dm6D, F, A, B D7sus4D, G, A, C Em7E, G, B, D E7sus4E, A, B, D Fmaj7F, A, C, E Fmaj7b5F, A, B, E F6F, A, C, D G7G, B, D, F G6G, B, D, E G7sus4G, C, D, F Am7A, C, E, G A7sus4A, D, E, G Bm7b5B, D, F, A

This scale holds many more chords than these, with extensions, inversions and every voicing on the neck. Find them all in Fretly

No 3 The A Shape

Frets: 2-6 1 – 2 – 3 – 4 – 5 – 6 – 7

The A Shape, C major scale, Fretly rendering

Built from the open A chord form, frets 2 to 6. Where the C shape ends, this one begins: the overlap notes belong to both.

The chord form this position is built around
The C major chord grip for this CAGED position
Explore the CAGED system in Fretly

Backing tracks

Jam this scale over these. They open on the track page.

C major scale circle diagram, Fretly rendering
How to play this position
How the CAGED 'A' chord shape connects

Triads

CC, E, G Csus2C, D, G Csus4C, F, G DmD, F, A Dsus2D, E, A Dsus4D, G, A EmE, G, B Esus4E, A, B FF, A, C Fsus2F, G, C GG, B, D Gsus2G, A, D Gsus4G, C, D AmA, C, E Asus2A, B, E Asus4A, D, E BdimB, D, F

Seventh chords

Cmaj7C, E, G, B C6C, E, G, A Cmaj7sus4C, F, G, B Dm7D, F, A, C Dm6D, F, A, B D7sus4D, G, A, C Em7E, G, B, D E7sus4E, A, B, D Fmaj7F, A, C, E Fmaj7b5F, A, B, E F6F, A, C, D G7G, B, D, F G6G, B, D, E G7sus4G, C, D, F Am7A, C, E, G A7sus4A, D, E, G Bm7b5B, D, F, A

This scale holds many more chords than these, with extensions, inversions and every voicing on the neck. Find them all in Fretly

No 4 The G Shape

Frets: 4-8 1 – 2 – 3 – 4 – 5 – 6 – 7

The G Shape, C major scale, Fretly rendering

Built from the open G chord form, frets 4 to 8, anchored on the low E string.

The chord form this position is built around
The C major chord grip for this CAGED position
Explore the CAGED system in Fretly

Backing tracks

Jam this scale over these. They open on the track page.

C major scale circle diagram, Fretly rendering
How to play this position
How the CAGED 'G' chord shape connects

Triads

CC, E, G Csus2C, D, G Csus4C, F, G DmD, F, A Dsus2D, E, A Dsus4D, G, A EmE, G, B Esus4E, A, B FF, A, C Fsus2F, G, C GG, B, D Gsus2G, A, D Gsus4G, C, D AmA, C, E Asus2A, B, E Asus4A, D, E BdimB, D, F

Seventh chords

Cmaj7C, E, G, B C6C, E, G, A Cmaj7sus4C, F, G, B Dm7D, F, A, C Dm6D, F, A, B D7sus4D, G, A, C Em7E, G, B, D E7sus4E, A, B, D Fmaj7F, A, C, E Fmaj7b5F, A, B, E F6F, A, C, D G7G, B, D, F G6G, B, D, E G7sus4G, C, D, F Am7A, C, E, G A7sus4A, D, E, G Bm7b5B, D, F, A

This scale holds many more chords than these, with extensions, inversions and every voicing on the neck. Find them all in Fretly

No 5 The E Shape

Frets: 7-10 1 – 2 – 3 – 4 – 5 – 6 – 7

The E Shape, C major scale, Fretly rendering

Built from the open E chord form, frets 7 to 10. For many players the most familiar barre territory on the neck.

The chord form this position is built around
The C major chord grip for this CAGED position
Explore the CAGED system in Fretly

Backing tracks

Jam this scale over these. They open on the track page.

C major scale circle diagram, Fretly rendering
How to play this position
How the CAGED 'E' chord shape connects

Triads

CC, E, G Csus2C, D, G Csus4C, F, G DmD, F, A Dsus2D, E, A Dsus4D, G, A EmE, G, B Esus4E, A, B FF, A, C Fsus2F, G, C GG, B, D Gsus2G, A, D Gsus4G, C, D AmA, C, E Asus2A, B, E Asus4A, D, E BdimB, D, F

Seventh chords

Cmaj7C, E, G, B C6C, E, G, A Cmaj7sus4C, F, G, B Dm7D, F, A, C Dm6D, F, A, B D7sus4D, G, A, C Em7E, G, B, D E7sus4E, A, B, D Fmaj7F, A, C, E Fmaj7b5F, A, B, E F6F, A, C, D G7G, B, D, F G6G, B, D, E G7sus4G, C, D, F Am7A, C, E, G A7sus4A, D, E, G Bm7b5B, D, F, A

This scale holds many more chords than these, with extensions, inversions and every voicing on the neck. Find them all in Fretly

No 6 The D Shape

Frets: 9-13 1 – 2 – 3 – 4 – 5 – 6 – 7

The D Shape, C major scale, Fretly rendering

Built from the open D chord form, frets 9 to 13. After this the pattern repeats: fret 12 is fret 0 again, and the C shape returns.

The chord form this position is built around
The C major chord grip for this CAGED position
Explore the CAGED system in Fretly

Backing tracks

Jam this scale over these. They open on the track page.

C major scale circle diagram, Fretly rendering
How to play this position
How the CAGED 'D' chord shape connects

Triads

CC, E, G Csus2C, D, G Csus4C, F, G DmD, F, A Dsus2D, E, A Dsus4D, G, A EmE, G, B Esus4E, A, B FF, A, C Fsus2F, G, C GG, B, D Gsus2G, A, D Gsus4G, C, D AmA, C, E Asus2A, B, E Asus4A, D, E BdimB, D, F

Seventh chords

Cmaj7C, E, G, B C6C, E, G, A Cmaj7sus4C, F, G, B Dm7D, F, A, C Dm6D, F, A, B D7sus4D, G, A, C Em7E, G, B, D E7sus4E, A, B, D Fmaj7F, A, C, E Fmaj7b5F, A, B, E F6F, A, C, D G7G, B, D, F G6G, B, D, E G7sus4G, C, D, F Am7A, C, E, G A7sus4A, D, E, G Bm7b5B, D, F, A

This scale holds many more chords than these, with extensions, inversions and every voicing on the neck. Find them all in Fretly

No 7 The C Shape, an Octave Up

Frets: 12-15 1 – 2 – 3 – 4 – 5 – 6 – 7

The C Shape repeated at the 12th fret, C major scale, Fretly rendering

Here the system closes. Fret 12 is the octave, so it behaves exactly like fret 0: the C shape returns, note for note, one octave higher. Compare this board with shape 1 and you see the same pattern, moved 12 frets along.

That is the whole point of CAGED. Five shapes cover the neck, and then they repeat for as long as the frets last.

The chord form this position is built around
The C major chord grip for this CAGED position
Explore the CAGED system in Fretly

Backing tracks

Jam this scale over these. They open on the track page.

C major scale circle diagram, Fretly rendering
How to play this position
How the CAGED 'C' chord shape connects

Triads

CC, E, G Csus2C, D, G Csus4C, F, G DmD, F, A Dsus2D, E, A Dsus4D, G, A EmE, G, B Esus4E, A, B FF, A, C Fsus2F, G, C GG, B, D Gsus2G, A, D Gsus4G, C, D AmA, C, E Asus2A, B, E Asus4A, D, E BdimB, D, F

Seventh chords

Cmaj7C, E, G, B C6C, E, G, A Cmaj7sus4C, F, G, B Dm7D, F, A, C Dm6D, F, A, B D7sus4D, G, A, C Em7E, G, B, D E7sus4E, A, B, D Fmaj7F, A, C, E Fmaj7b5F, A, B, E F6F, A, C, D G7G, B, D, F G6G, B, D, E G7sus4G, C, D, F Am7A, C, E, G A7sus4A, D, E, G Bm7b5B, D, F, A

This scale holds many more chords than these, with extensions, inversions and every voicing on the neck. Find them all in Fretly

Theme